For Green Bean Casserole, Just Say NO!
to Canned Green Beans & Mushroom Soup
(Part 3 - The Onion Topping & Baking)

How to make a green bean casserole from scratch with fresh green beans and fresh mushrooms. Below are step-by-step photos showing how to make the fresh green bean casserole recipe so many cooks have made (and loved!) since 2006. It's an adaptation of a Cooks' Illustrated recipe so good I dubbed it the World's Best Green Bean Casserole.
To make the pages load faster, especially for those using their phones and other mobile devices from the kitchen, the recipe tips are in three sections:
HOW-TO PHOTOS & COOKING TIPS for the
WORLD'S BEST GREEN BEAN CASSEROLE
~ Part 1: How to Cook the Green Beans ~
~ Part 2: How to Cook the Mushroom Sauce ~
~ Part 3: How to Mix the Topping & Bake the Casserole (you are here) ~
~ return to recipe for World's Best Green Bean Casserole ~
~ Printer Friendly Recipe ~
WORLD'S BEST GREEN BEAN CASSEROLE
~ Part 1: How to Cook the Green Beans ~
~ Part 2: How to Cook the Mushroom Sauce ~
~ Part 3: How to Mix the Topping & Bake the Casserole (you are here) ~
~ return to recipe for World's Best Green Bean Casserole ~
~ Printer Friendly Recipe ~
 TIP #12 - CANNED ONION RINGS So this is slightly controversial, not everyone agrees. But what "keeps" the World's Best Green Bean Casserole firmly entrenched in its "familiar comfort food" position is canned onion rings. I know, I know, read the ingredient label and you wonder if we can't do better. They are mixed with good bread, so we use fewer of them than the traditional version with canned beans and canned mushroom soup. But still. TIP #12 - CANNED ONION RINGS So this is slightly controversial, not everyone agrees. But what "keeps" the World's Best Green Bean Casserole firmly entrenched in its "familiar comfort food" position is canned onion rings. I know, I know, read the ingredient label and you wonder if we can't do better. They are mixed with good bread, so we use fewer of them than the traditional version with canned beans and canned mushroom soup. But still. Since 2006, I've used the canned onion rings. This year, just to see, I'm going to try a homemade topping. The recipe for the World's Best Green Bean Casserole includes several techniques used by other cooks. So with that, is it okay to carry on? Let's. |
 TIP #13 - WHIZ THE BREAD CRUMBS ETC BUT NOT THE CANNED ONION RINGS Break the bread into pieces, add the soft butter. Don't forget the salt and pepper, they're critical. Whiz the bread a few times, you want relatively large pieces, pieces that are obviously made from real bread, not a fine grain. TIP #13 - WHIZ THE BREAD CRUMBS ETC BUT NOT THE CANNED ONION RINGS Break the bread into pieces, add the soft butter. Don't forget the salt and pepper, they're critical. Whiz the bread a few times, you want relatively large pieces, pieces that are obviously made from real bread, not a fine grain.OH. The bread. I've used homemade bread, Whole Grain Bread and Light 'n' Fluffy Homemade Whole-Grain Bread & Buns but any good-tasting, whole-grain bread will do. In the photo, I've used an artisan olive and rosemary roll from the bakery, it was excellent. No white bread! |
 TIP #14 - MIX THE TOPPING BUT DON'T PUT IT ONTO THE BEANS UNTIL YOU'RE READY TO BAKE THE CASSEROLE Now stir together the bread crumbs and the onion rings. What you do now depends on whether you're going to bake the casserole right away or whether you're going to bake it later. TIP #14 - MIX THE TOPPING BUT DON'T PUT IT ONTO THE BEANS UNTIL YOU'RE READY TO BAKE THE CASSEROLE Now stir together the bread crumbs and the onion rings. What you do now depends on whether you're going to bake the casserole right away or whether you're going to bake it later. |
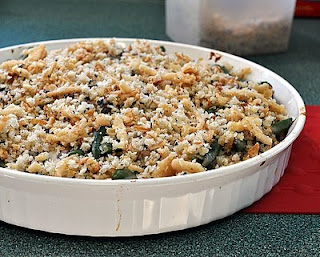
 TO BAKE THE GREEN BEAN CASSEROLE RIGHT AWAY Sprinkle the topping, well, you know, on top of the beans. Use your fingers to do this, it's easier to spread the topping evenly. TO BAKE THE GREEN BEAN CASSEROLE RIGHT AWAY Sprinkle the topping, well, you know, on top of the beans. Use your fingers to do this, it's easier to spread the topping evenly. Bake uncovered at 425F for about 15 minutes. It doesn't take long, everything's cooked and is either warm or slightly warm, definitely not cold so you're just heating it through and crisping up and browning the topping. |
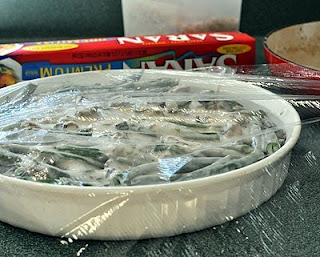
 TO MAKE AHEAD AND BAKE LATER Cover the beans with plastic wrap and refrigerate. Keep the crumb topping separate from the casserole. If you put the topping on now, it would get all soggy. We don't want soggy! Refrigerate the topping mixture too. TO MAKE AHEAD AND BAKE LATER Cover the beans with plastic wrap and refrigerate. Keep the crumb topping separate from the casserole. If you put the topping on now, it would get all soggy. We don't want soggy! Refrigerate the topping mixture too. |
 TIP #15 - BEFORE BAKING, ALLOW TIME TO RETURN THE CASSEROLE TO ROOM TEMPERATURE It just makes sense that it takes longer to heat a dish that starts off cold than to heat a dish that starts off slightly warmer. This is especially important at Thanksgiving, when oven space is so coveted. That's why I always recommend bringing side dishes to room temperature well before they need to go in the oven. TIP #15 - BEFORE BAKING, ALLOW TIME TO RETURN THE CASSEROLE TO ROOM TEMPERATURE It just makes sense that it takes longer to heat a dish that starts off cold than to heat a dish that starts off slightly warmer. This is especially important at Thanksgiving, when oven space is so coveted. That's why I always recommend bringing side dishes to room temperature well before they need to go in the oven.A single or double batch in a shallow dish will take less time to warm to room temperature than a triple or quadruple batch in a deep casserole dish. Once the casserole has warmed up, then take off the plastic wrap but do NOT put the topping on yet. |
 For the moment, leave off the topping and bake just the beans, baking them until they're all hot and bubbly. Depending on the temperature of the bean mixture and the depth of the dish, this can take from 10 to 40 minutes. For the moment, leave off the topping and bake just the beans, baking them until they're all hot and bubbly. Depending on the temperature of the bean mixture and the depth of the dish, this can take from 10 to 40 minutes. Doesn't this look just delicious?! |
 Now sprinkle the topping over the hot and bubbly beans and put back into the oven, still uncovered, for another 15 minutes. Now sprinkle the topping over the hot and bubbly beans and put back into the oven, still uncovered, for another 15 minutes. |
 Finally, it's time to dig in! Give yourself a big pat on the back for investing extra time and effort into making something that's really fresh and delicious. Look around you -- doesn't everyone agree? This is truly the World's Best Green Bean Casserole! Finally, it's time to dig in! Give yourself a big pat on the back for investing extra time and effort into making something that's really fresh and delicious. Look around you -- doesn't everyone agree? This is truly the World's Best Green Bean Casserole! |
DO YOU LIKE THIS RECIPE? SIGN UP FOR A FREE E-MAIL SUBSCRIPTION AND YOU'LL NEVER MISS A NEW RECIPE. A Veggie Venture is the food blog about vegetables, home to the famous A-Z of Vegetables and second-generation food writer and 'veggie evangelist' Alanna Kellogg. For 'home delivery' of new vegetable recipes from A Veggie Venture, sign up here. Once you do, new recipes will be delivered, automatically, straight to your e-mail In Box. Subscriptions are free and every recipe includes nutrition information, Weight Watchers points and Alanna's tips and tricks, useful ideas for new and experienced cooks alike.
© Copyright Kitchen Parade 2010


This may seem silly but...the green beans in the your finished dish aren't broken into bite-sized pieces as directed in the green-bean section.
ReplyDeleteJust something I noticed.
Hi Parin -- Great attention to detail! I actually totally forgot to break up the green beans when I shot the photos with this last batch. I point that out in Part 1 that shows all the tips for cooking the beans. And it's an important step -- because the servings will go farther, because it's easier to spoon out onto plates. Thanks for pointing out my oversight, I love careful readers!
ReplyDeleteThanks for the helpful post! I would not have gotten this otherwise!
ReplyDeleteThis comment has been removed by a blog administrator.
ReplyDeleteThis comment has been removed by a blog administrator.
ReplyDeleteThis comment has been removed by a blog administrator.
ReplyDeleteThis comment has been removed by a blog administrator.
ReplyDeleteThis comment has been removed by a blog administrator.
ReplyDeleteThis comment has been removed by a blog administrator.
ReplyDeleteThis comment has been removed by a blog administrator.
ReplyDeleteThis comment has been removed by a blog administrator.
ReplyDeleteThis comment has been removed by a blog administrator.
ReplyDeleteThis comment has been removed by a blog administrator.
ReplyDeleteThis comment has been removed by a blog administrator.
ReplyDeleteThis comment has been removed by a blog administrator.
ReplyDeleteThis comment has been removed by a blog administrator.
ReplyDeleteThis comment has been removed by a blog administrator.
ReplyDeleteThis comment has been removed by a blog administrator.
ReplyDeleteThis comment has been removed by a blog administrator.
ReplyDeleteThis comment has been removed by a blog administrator.
ReplyDeleteThis comment has been removed by a blog administrator.
ReplyDeleteThis comment has been removed by a blog administrator.
ReplyDeleteThis comment has been removed by a blog administrator.
ReplyDeleteThis comment has been removed by a blog administrator.
ReplyDeleteThis comment has been removed by a blog administrator.
ReplyDeleteThis comment has been removed by a blog administrator.
ReplyDeleteThis comment has been removed by a blog administrator.
ReplyDeleteThis comment has been removed by a blog administrator.
ReplyDeleteThis comment has been removed by a blog administrator.
ReplyDeleteThis comment has been removed by a blog administrator.
ReplyDelete